Showing posts with label blog. Show all posts

Saturday, October 22, 2016

moda designer blog hop

moda designer blog hop


im honoured to be part of the moda designer blog hop this time around...the idea is that each day for 5 days in december, 4 or 5 moda designers will each post a new quilt block pattern and favourite recipe, and heres mine!

making the under over block
framed block on my christmas mantel

introducing the under over quilt block - so called because it reminded me of woven ribbons...the inspiration for it actually came from a paperchase box i bought to carry all the little bits and pieces i made for the moda stand in houston, so rather fitting i thought. (id link to it, but they dont appear to have it in their online shop)

pretty treeeeeee

ive had a lovely weekend clearing the decks then filling them up again with christmasy goodness...and yes, im really anal about doing the christmas tree, red, white, silver, and just an occasion flash of gold.

and after all that hard work, theres nothing nicer than sitting down with a bowl of still-warm up and over pudding with a scoop of ice cream - delicious!

up and over pudding recipe, yum!
UPDATE: for those of you struggling to properly print the recipe and block, right click on each image & download and save to your computer, then print as normal. sorry for the problems!

be sure to hop over to the other blogs today for lots more quilt block patterns and recipes, or check out the this moda blog post to find out the full schedule.

todays other participants are:

kansas troubles
figtree quilts
cosmo cricket
liz scott

so have fun and check out some new quilty peeps! (especially joanna of fig tree & julie of cosmo cricket - they were my houston homies)


moda designer blog hop

Friday, October 21, 2016

My Blog Makeover

My Blog Makeover


I am really excited to share my new blog design!  I think I have as much fun changing up my blog as I have changing up my house! Except it takes a whole lot longer to change up my blog.  I have zero experience in this kind of thing.  I just sort of wing it.  And do a lot of Google searches.  And cry.  Ok well actually there were no tears.  But I thought about it a couple of times.  :-)


So how did a complete novice make a new header, blog button, center the navigation bar, and tweak my borders?  With the help of my friends.  No, they arent my real life friends (although it would be cool if they were because they are super smart).  They are my blog friends.  And they are awesome at explaining how to do your own blog stuff.

Yesterday, I told you about Kim at Cheap Chic Home.  Shes the one who shared all that info to get my "Featured" and "Where I Link" pages looking better.  That was the first step.  It sort of snowballed from there.

I knew that I had to learn a new photo editing site - now that Picnik is closing.  So I downloaded GIMP.  And I soon realized that this was way over my head.  I had no idea how to even get started.  So, I went on the hunt for something a little easier.  I downloaded Pixlr.  (Side note - when I downloaded Pixlr, I had no idea there was a Pixlr Express.  I assume it is similar to Picnik - and Im looking forward to trying it.)  It did take a while to figure out this photo editing program.  It really isnt as user friendly as Picnik.  But once I started adding layers and text, it was fun.  And I know that I havent even scratched the surface on all that this program can do. But I wanted my header to be simple.  And I like the result.

I could probably throw together a small tutorial of the how-tos for the header.  If anyone is interested, please leave a comment.  I didnt really search out much help.  Again, I just winged it.  But the more I played around with it, the more comfortable I became.  And the more fun I had.  I would recommend giving it a try.

After designing my header, I was still trying to figure out how I could make it wider and more in line with my blog.  Another Google search brought me to Cindy at Cinsarah.  She has a beautiful blog - which she designed herself.  And she has a bunch of tutorials for the novice blog designer.  I found so many answers.  I learned how to get rid of the padding (so my header would be wider).  Thats also where I found the coding to center my navigation bar (all of those tabs under my header).  She made it very easy.  Yay!

Trying new things isnt easy.  And I know my blog still needs some work (Im still tweaking it).  But I love learning new things and Im glad I took the time to do my blog makeover by myself.  It was a fun little break from painting!


My Blog Makeover

Wednesday, October 19, 2016

The blog wins an award!

The blog wins an award!


Katherine Tyrrells wonderful Making a Mark blog does annual awards every year, and the blog wins for The Most Gorgeous Mouthwatering (MGM) Studio of the Year!


You can read about it HERE, and thank you very much, Katherine! We did start this blog in the hopes of encouraging other artists to realize their dream...

As you know, I do work there virtually daily, and find it very conducive to concentration.  No TV, no telephone, no computer, just books, art, and music.  Plus a place to make tea, of course!

So thank you again, Katherine, were delighted! 


The blog wins an award!

Tuesday, October 18, 2016

How I Made My Blog Button

How I Made My Blog Button


I was really excited to finally add my very own blog button last week!  And, because Im cheap thrifty, I made it by myself instead of hiring a designer.  I figured that a simple button would work (I actually prefer simple graphics - its just more my style).  So with that in mind, I headed over to Pixlr.com to spend some quality time with my laptop.  I am a complete novice so it took a little time to get used to (well actually, I made my header first - which was a little challenging.  Making this button was easier once I was a little more familiar with Pixlr).  And since Picnik is going away (boo), I knew that Id needed to learn something new anyway.  Heres my step-by-step Pixlr instructions - just in case you want to jump into button making too.

To start, I found an image to work with.  I just did a Google Image search for burlap.  Once I found an image that I liked, I saved it to my computer.  Another alternative is to use free digital scrapbooking images.  A quick Google search will bring up lots of options.

I went to Pixlr.com - and chose "Open Image from Computer".


Heres my uploaded burlap pic - 


A standard blog button is 125 x 125 and my picture is 320 x 320 so I needed to adjust the image size.  I opened the drop down menu under "Image" and clicked "Image size..."


A new box popped up allowing me to type in my new size (125 x 125) - 


Then I clicked "OK".  Now I wanted to add text.  To do this, I clicked on the "A" in the tool menu.


I typed "my covered bridge" in the pop up box.  Now the fun part - making it look pretty.  I started by picking a font.  I clicked the drop down menu to see all of the options - 


Once I chose a font (Gungsuh), I adjusted the font size.  


Using the sliding scale, I ended up at 25.  I then needed to change the text color.  I clicked on the color box which brings up another pop up - 


I played around with some different colors and finally chose #4a6a94.  Then hit "ok". The last step was to move the text where I wanted it.  I made sure to use the "Move" tool located at the top of the Tools box - 


Once I had it where I liked it, I hit "ok" on the text box pop up.  Then I saved my button from the "File" drop down menu - 


Thats it!  I hope this tutorial helps some of you - and remember that if I can do this, so can you!  Pixlr isnt so scary once you play around with it.

Want to know how to install your new button?  Heres my tutorial for installing a button with a grab box.

Ive shared this post here -

Creations by Kara
Saved by Love Creations
Night Owl Crafting
The Shabby Creek Cottage
My Romantic Home
30 Handmade Days


How I Made My Blog Button

Friday, October 14, 2016

Blog Tips I Pinned It and Did It!

Blog Tips I Pinned It and Did It!


I started my blog in July.  I had have no idea what Im doing yet.  :-)  But Im willing to learn.  And, luckily, some people know exactly what theyre doing.  And they are willing to share what they know.  And they have step-by-step instructions...with pictures.  Yay!  So, when I was looking for ways to make my blog look prettier, I did a little Google search.  And I found Kim at Cheap Chic Home.  She has some great blog tips which has helped me a ton.  I even pinned her whole blog onto my Pinterest "Blogs to Visit" board.

Over the last few days, I spent a lot of time cleaning up my "Featured!" and "Where I Link" pages.  I followed Kims instructions and lined up all of those beautiful blog buttons.  I am thrilled with the result.  Actually, Im so thrilled, that I finally made my own blog button!


If youre wondering why my button looks so different from the rest of my blog, its because I decided to make more changes.  I designed a new header on Pixlr and Ill reveal it tomorrow (hopefully)!  I decided to jump into the world of graphic design - yikes.  It was not easy for me. I spent a couple of hours looking at a blank screen.  Completely confused.  But slowly, I was able to figure out how to add pictures and layers and all sorts of fun stuff.

So, check out my "Featured!" and "Where I Link" pages.  And, if you want to know how to line up all of those blog buttons on your blog, head over to Cheap Chic Home for great instructions!


Blog Tips I Pinned It and Did It!

Wednesday, October 12, 2016

Office Shed–Little Claire Blog Project

Office Shed–Little Claire Blog Project


Office Shed (7)

Morning All. It’s my turn to share a digi stamp project over on the Little Claire Blog today. I have used the Office Shed and Seed Packet digi stamps to create a Father’s Day card for my Dad

He will love this card as he really enjoys gardening but it’s also a little joke too, as just after Father’s Day he is helping me build a new shed as the current one that was here when we moved is falling apart a bit more everyday.

To see full details on how the card was made please hop over to the Little Claire Blog.

Supplies:

  • Image: Office Shed and Seed Packet digi stamps from Little Claire
  • Sentiment: Created in Word using Grandma’s Garden Font (available from www.dafont.com)  
  • Colouring Medium: Copics
    • Shed: E18, E15, E13, E11, E39 and E33
    • Sign and door handle: B99, B95 and B91
    • Plant Pots: E29, E27, E25, E23 and E21
    • Spade: C9, C7, C5 and C3
  • Card: Beige, Blue, Green and White Card and Copic X-Press It Blending Card
  • Dies: Spellbinder Plain Circle Dies and Memory Box Puffy Cloud Dies

I would like to enter this card into the following challenges:

  •  

Thanks for stopping by

Lisa


Office Shed–Little Claire Blog Project

Tuesday, October 4, 2016

Welcome to the Plymouth Watershed Blog site!

Welcome to the Plymouth Watershed Blog site!


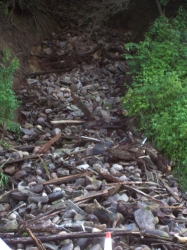
The Town of Plymouth and the Plymouth Watershed Commitee would like to welcome you to our Plymouth Watershed blog - where we will be recording our progress on the maintenance and restoration of the Canasawacta Creek in the town of Plymouth via a Plymouth citizen led committee of Volunteers. We will use this forums as one of the means of communicating with the town citizens and taxpayers news relating to the project. This forum will serve as a means to alleviate some of the costs associate with administrative mailings. Be sure to check back regularly as well be updating the blog as things occur. Above are pictures from the Evesun Photos site that captured the Flood of 2006. One is of our Foster Park and it shows the damage resulting from the flood. The second photo is just east of Foster Park on State Route 23 showing the debris washed out of the hills and down into the valley - depositing itself in the Creek. Multiply this by the number of tributaries into the creek and you can imagine the force that was at work.


Welcome to the Plymouth Watershed Blog site!

How To Install A Blog Button

How To Install A Blog Button


Yesterday, I explained how I made my own blog button in Pixlr.  I really love Pixlr because its free and it can do a ton of things.  I used it to create my button and header.  Ive been playing around with it a lot and starting to become more comfortable with the program.  Its a lot of fun (and sometimes a great source of frustration, if Im being completely honest).  But since were losing Picnik (which was so user-friendly), learning a new program is essential.  Ill share more of my Pixlr creations soon.  Ill even show you how I made my header (and how I centered it, and eliminated the padding, etc).  But, today Im going to show you how to install a blog button in blogger.  Ill give you step-by-step instructions for putting it in your sidebar, so others can take it!

To start, you need to find a host for your new button.  I use Photobucket.  Its easy to use and has worked well for me.  Just open an account -


Next, upload your picture - 


Once its uploaded, click "view album" to see your picture.  If you hover over the picture, a drop down menu will appear.  You will need to find the HTML Code in a minute so make sure you can find it.


Now, head back to your blog (you may want to open a new tab).  In the upper right hand corner, choose "Design".  Look in your sidebar, and choose "Add a Gadget" - 


In the pop-up box, choose "HTML/Javascript" - 


If you want to add a title, you can (I added "Grab My Button!") but it isnt necessary.  In the larger box, you need to add the following - 

<center>
<a href="http://mycoveredbridge.blogspot.com"target="_blank" title="My Covered Bridge"><img alt="My Covered Bridge" src="http://i1180.photobucket.com/albums/x414/kristenW4/mycoveredbridgebutton.jpg"/></a><center>

</center>

<center><textarea id="code-source" rows="3" name="code-source"><center><a href="http://mycoveredbridge.blogspot.com"><img border="0" src="http://i1180.photobucket.com/albums/x414/kristenW4/mycoveredbridgebutton.jpg " /></a></center></textarea></center>
</center>


BUT you need to make the following changes - 

1. There are 2 lines in red.  This is your blog address.  Insert YOUR URL in place of mine - in both places.

2. There are 2 lines in green.  This is where your picture is located.  If you head back to Photobucket, and hover over the picture that you want to use, the drop down box will have an option titled "HTML Code".  Just click on it to copy.


Now replace the 2 green lines with YOUR HTML code.

3. There are 2 lines in blue.  Just replace them with your blog name.

Now click "Save" and "View Blog".  Your new button and grab box should be nicely centered on your sidebar.  If it isnt, just go back and check the code - it may just be missing a quotation mark or other character.  Unfortunately, HTML code needs to be very accurate.  Hopefully, it works for you.  And remember, Im not an expert and I did it.  You can do it too!

Ive shared this post here - 

My Romantic Home
30 Handmade Days


How To Install A Blog Button